Brown Rice Mushroom Risotto

This brown rice mushroom risotto is made with brown rice instead of the traditional arborio rice, which ups the nutritional value. Using the oven makes it super easy!ll

Brown Rice Mushroom Risotto

Brown Rice Mushroom Risotto

Course Side Dish
Servings 6
Calories 240 kcal

Ingredients
  

  • 6 cups vegetable broth
  • 3 tbsp olive oil, divided
  • 1 onion, chopped
  • 2 cloves garlic, minced (2 tsp)
  • 1 tsp salt
  • ½ cup white wine
  • 1 cup brown rice
  • 8 oz carrots, julienned (2 cups)
  • 8 oz mushrooms, sliced (2 cups)
  • 2 tbsp butter
  • ½ cup shredded parmesan cheese

Instructions
 

  • Preheat oven to 375℉.
  • Place broth in a saucepan and place it on the stove to heat.
  • Heat 2 tbsp olive oil in a separate oven-proof pan.  Add onions, garlic and salt.  Saute until the onions are soft, about 5 minutes.
  • Add wine and rice to the onions and heat, stirring constantly, until it reaches a simmer. 
  • Add heated broth to the rice mixture.  Cover the pan with a tightly fitting lid and place in the preheated oven for one hour or until all the liquid is absorbed.
  • While the rice is cooking, place the remaining olive oil in a saute pan and add carrots.  Cover the pan and cook over medium heat for 5 minutes, stirring occasionally.  Add mushrooms to the carrots and saute for an additional 5 minutes.
  • Remove rice from the oven and stir in butter and parmesan cheese until it takes on a creamy texture.  Stir in carrot mushroom mixture and serve.
  • Hack: Dehydrated vegetables can be used in this recipe!
  • Hack: One cup of chopped frozen onions can be substituted for fresh onion in this recipe.
  • Hack:  Check the produce department of your local grocery store for single and/or pre-cut carrots and mushrooms to avoid having to buy more than needed. 
Keyword brown rice, healthy, low calorie, mushroom, rice, rice side, risotto, vegetarian

Did you know?   Brown rice is a super nutritious whole grain packed with various nutrients.

Suggestion:  Pairing brown rice with beans provides a powerhouse of nutritional benefits so serve this with one of my bean recipes such as red bean casserole!

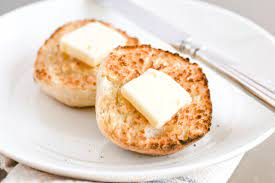
Easy Homemade English Muffins

Sure, you can pick up a package at the store but these easy homemade English muffins are super fresh and tasty with some jam or chutney!

Easy Homemade English Muffins

Easy Homemade English Muffins

Course Bread
Servings 1 muffin
Calories 179 kcal

Ingredients
  

Starter:

  • ¾ cup water
  • tsp yeast
  • ¼ tsp sugar
  • cup all-purpose flour

English Muffin Dough:

  • ¾ cup milk
  • 2 tbsp butter
  • 2 tbsp sugar
  • 1 tsp yeast
  • cups all-purpose four
  • 2 tbsp cornstarch
  • 1 tsp salt
  • 2 tsp baking powder

Instructions
 

Starter:

  • In a small microwave-safe bowl, mix water and sugar.  Heat in microwave to a temperature of between 110℉ - 115℉.  This should take less than a minute and it’s very important to use a thermometer to get the correct temperature.
  • Dissolve yeast in water mixture and set aside for 7 minutes to proof.  Normally, I would look for a foam to form on the top but in this case, because of the small amount of yeast, the blooming will not be obvious.
  • Mix the flour with the yeast mixture.  Cover and leave it at room temperature for at least 4 hours or up to 16 hours.  It will be fluffy and full of bubbles.

English Muffins:

  • In a small microwave-safe bowl, mix milk, butter and sugar.  Heat in microwave to a temperature of between 110℉ - 115℉.  This should take less than a minute and it’s very important to use a thermometer to get the correct temperature.
  • Dissolve yeast in milk mixture and set aside for 7 minutes to proof.  It should “bloom” or form a foam on top.
  • In the bowl of a stand mixer, place the flour, cornstarch, salt and baking powder.  Add starter and bloomed yeast mixture.  Beat on low speed for 8 minutes.
  • Cover and let rise for 1½ hours.
  • Preheat a skillet to 325℉. Place English muffin rings (I used silicone egg rings) on the skillet and spray lightly with cooking spray.  Pour ¼ cup of batter into each ring and “swish” it around a bit to spread it out.
  • Cook undisturbed for 10-15 minutes until a skin forms on the upper side of the muffin.  Remove the ring, flip the muffins and cook for another 5-7 minutes or until the internal temperature reaches 200℉.
  • Transfer muffins to a rack and allow to cool completely.  For the best flavor, store in a tightly covered container or plastic bag overnight before eating.  
  • Hack:  If you prefer to bake these in the oven, reduce the initial rising time to one hour.  Place rings on a baking sheet and coat lightly with cooking spray.  Pour ¼ cup of batter into each ring, cover and let rise for an additional hour.  Bake in a preheated 350℉ oven for 25 minutes or to an internal temp of 200℉.
  • Hack: If you don’t have rings, you can make these without them.  The edges will not be as well-defined but they will still taste great!
  • Hack:  Store English muffins at room temperature for 1-2 days, in the refrigerator for up to 4 days or in the freezer for up to 8 weeks.
Keyword bread, breakfast, easy, english muffin, fried, homemade, sandwich, simple, skillet, toast, yeast


While the origin of the English muffin is uncertain, the name is strictly American.  The British version is known as a “crumpet”.  Check out some more fun facts here!

Suggestion:  Serve these with some old-fashioned apple butter or fig chutney!

error

Enjoy this blog? Please spread the word :)

Follow by Email
YouTube
YouTube
Pinterest
Pinterest
fb-share-icon
LinkedIn
LinkedIn
Share
Instagram