6 Foods That Were The Spawn Of Satan…Until They Weren’t

Remember when nuts were unhealthy? Or when cranberries caused cancer? Here’s my take on 6 Foods That Were The Spawn Of Satan…Until They Weren’t


6 Foods That Were The Spawn Of Satan...Until They Weren't
6 Foods That Were The Spawn Of Satan…Until They Weren’t

Remember when nuts were unhealthy? Or when cranberries caused cancer? Here’s my take on 6 Foods That Were The Spawn Of Satan…Until They Weren’t

When was the last time you heard that a particular food was bad for you?  Maybe it was today.  Maybe it was yesterday.  Maybe you can’t open your computer or turn on your TV without hearing about the latest culinary evil that’s out to ruin your health.

Now ask yourself when was the last time you were told that a favorite nosh was certain death only to find out they were wrong?  How many times can you remember that happening?

For your entertainment, I’d like to share with you a few foods that were considered the spawn of satan…until they weren’t…

The Skinny On Fats

The Skinny On Fats
The Skinny On Fats

It seems that nothing has gotten a worse rap than fat and cholesterol.  Way back in the 1970s, the consensus began to take hold that eating fat caused fat to build up in the body and eating foods with cholesterol caused cholesterol to build up in the arteries.  This was followed by a push to eat more sugar as a way to promote weight loss and energy.

This theory was eventually (and thankfully) disproved before the following 3 foods were forced to take a permanent dirt nap.

Eggs: Canadian researchers did a study of 1,231 patients to measure the linear increase in arterial plaque for people over 40.  The study focused on which was worse: smoking (measured in pack-years) or consuming egg yolk (measured in yolk years).  It was concluded that eating one egg yolk per day was as risky as smoking 5 cigarettes

ll turns out that it’s saturated fat that’s often consumed in the whole breakfast, not the cholesterol in eggs, that raises “bad” cholesterol (I’m looking at you, breakfast sausage). Eggs are a healthy source of high-quality protein, healthy fats as well as necessary vitamins and minerals.

Butter: The popularity of butter took a plummet back in the 1980s due to claims that cholesterol and saturated fat lead to coronary heart disease.  Turns out the manmade trans fats found in margarine were worse.

While manufacturers have moved away from using trans fats in margarine, butter has come surging back as the underdog of the dinner table.  The argument now rages as to whether we should be using synthetically produced margarine or butter, a natural food that (unquestionably) tastes better.  The scientific community now agrees that both can be part of a healthy diet if used sparingly.

Welcome home, butter.  I’ve missed you.

Nuts were once considered to be unhealthy due to their high-fat content.  It’s now accepted that nuts are a nutrient-dense food that lowers the risk of disease by decreasing cholesterol, insulin resistance and blood vessel dysfunction.

Stop The Ride, I Want To Get Off

Stop The Ride, I Want To Get Off

They were good…they were bad…they were good again…occasionally all at the same time!

Cranberries were first cultivated for commercial sale in 1816 in New England.  Because of their growing season, which extends into November, these tart little berries became a favored Thanksgiving treat and enjoyed brisk sales until November 1959  when it was discovered that some cranberry samples tested positive for an herbicide that was thought to cause cancer.

Although cranberries were quickly cleared of any health hazards, sales struggled for the next several years.  This was devastating for an industry that made the vast bulk of its profit over the winter holiday season.  The answer to their prayers came in the early 1960s when Ocean Spray’s new CEO came up with a plan:  Mix cranberry juice with sugar water and sell it year-round as a “Cranberry Juice Cocktail”.  It was an instant hit and now both the juice and the cranberry itself are back in the good graces of John Q. Public.  And, while we’re on the subject, check out my recipe for Fresh Whole Cranberry Sauce!

Bananas have a rollercoaster history worthy of a soap opera.  They may have been cultivated as early as 1000 B.C. and became a popular treat shipped to different parts of the world beginning in the 7th century.  By the 1700s, boats were reluctant to ship bananas due to superstitions that they caused the boats to sink and jinxed fish hauls.

Somewhere towards the end of World War One, United Fruit (who imported bananas) began to tote the delightful yellow fruit as a cure for childhood celiac disease while, at virtually the same time, others referred to them as “a cause of indigestion and a treacherous dietary component”.  Researchers immediately came to the banana’s defense, calling them “a wholesome, palatable and nutritious article of food”.

This debate continues today with claims that bananas rot your teeth, lower your blood pressure and cause migraines.  They aggravate constipation…unless they don’t.  And don’t even get me started on how the fiber in them helps you lose weight unless the sugar makes you gain.

Is your head spinning yet?

Remember That One Time You Had To Give Up Coffee?

Remember That One Time You Had To Give Up Coffee?

For years, doctors warned that drinking coffee led to a plethora of health risks:  It could increase the risk of heart disease, stunt growth, cause stomach ulcers and heartburn, among other things.  The problem?  They didn’t factor in other risks like smoking, alcohol consumption, height, weight, diet, gender, ethnicity and blood pressure.  A new study, done in 2019, did not endorse drinking coffee but it did debunk the previous studies.

Other recent studies show that coffee lowers the risk of developing diabetes and liver damage while boosting our concentration and memory.  It may even ward off the mental decline caused by dementia.

The bad news?  Caffeine is still addictive and withdrawal symptoms may cause headaches.  It can interrupt sleep patterns and momentarily raise blood pressure.  Considering my two-cups-a-day habit, I say it’s worth the trade-off!

 Maybe The Problem With Food Is Food Itself

Maybe The Problem With Food Is Food Itself

Nutraceuticals and fortified foods walk a thin line between food and medicine.  Ever since we got it into our heads that certain foods are “good” for us, society has been on a mission to consume more of these foods, whether it be by eating copious amounts of a single food or taking it in pill form.

This article from 1896 gleefully predicts a future where it’s not necessary to eat food at all, instead a person would simply take a pill to fulfill their daily nutritional needs.

The author admits these pills won’t taste as good as real food but seems excited at the prospect of being able to give up dinner parties and the accompanying “symposia” that go with it.  No, you’re right…conversation is overrated.  And let’s not forget that “the pleasures of the table have ages on end been absorbing too much of the time and inclination of man and woman.” 

Thankfully, this dire prediction hasn’t come to pass yet…and let’s hope it never does!  For more of my thoughts on nutraceuticals, check out this article.

Just One Word: Ugh

Just One Word: Ugh
Just One Word: Ugh

What are we supposed to eat now?  Who are we supposed to believe?  What’s the deal?!?

How about this word:  Context.

Many studies are undertaken to prove or disprove a particular theory and are often laser-focused to the point of silliness.  At least one of those coffee studies includes people who drink up to 25 cups of coffee daily.  And one discussion of how bananas rot our teeth included a baby whose parents allowed him to suck on bananas in place of a pacifier.  Most of us don’t do either of those things so, really, do those studies even apply to us?

Here’s another word:  Variety.

The most reasonable and healthy thing to do is to eat a variety of different foods.  How many cranberries do you really need?  And eating an entire jar of almonds will only ensure you don’t have any room to consume the other nutrients that are necessary for our bodies to function.  While healthy, one cannot live on almonds alone.

Here’s my idea:  Look at all those studies with a critical eye and decide if they really apply to you.  Then go ahead and eat a variety of healthy foods to ensure that you have the right fuel mix to keep your engine running.

What’s your take on the subject?  Let me know in the comments below!

All my best,

Cynthia
cynthia@cynthiaeats.com


Easy Fresh Green Onion Pesto

Spread this delicious fresh green onion pesto on your toast, roll it up in chicken, smother your salmon or toss it in pasta. How do you like your pesto?

Fresh Green Onion Pesto

Fresh Green Onion Pesto

Course Appetizer, Snack
Servings 8 servings
Calories 175 kcal

Ingredients
  

  • 2 cups scallion or green onions, coarsely sliced
  • 1 cup fresh basil
  • 2 tbsp fresh chive
  • 5 cloves garlic (5 tsp minced)
  • ½ cup olive oil
  • ¼ cup pine nuts
  • ¼ cup parmesan cheese
  • 3 tbsp lemon juice
  • ½ tsp salt

Instructions
 

  • Place all ingredients in a blender or food processor and blend until smooth.
  • Hack:  Pesto can be stored in the refrigerator for up to 7 days or frozen for 12 months.  I recommend freezing in ice cube trays and then removing portions to a freezer-safe container so you can thaw just the amount you need.
  • Hack:  Pine nuts can be stored in an airtight container in the refrigerator for 2 months or in the freezer for 6 months.
  • Hack:  Chop leftover green onions and freeze them in a sealable freezer bag or container for future use.  While they won't retain the crispy texture of fresh green onions, they will be fine for use in cooking.
Keyword appetizer, easy, football snacks, green onion, healthy, hors d'oeuvres, low calorie, party food, pesto, pizza, quick prep, scallion, snack, vegetarian

Did you know?  Green onions are an excellent source of vitamin K!  Check out some more healthy benefits here!

Suggestion:   Use this pesto to make Chicken Pesto Naan Pizza!

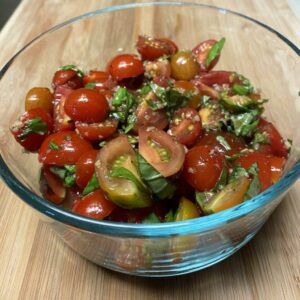
Quick and Easy Homemade Bruschetta

Although this easy homemade bruschetta is best known as an appetizer served on toasted bread, it’s also tasty when tossed with pasta, over potatoes, with rice or eggs!

Easy Homemade Bruschetta

Easy Homemade Bruschetta

Course Appetizer
Cuisine Italian
Servings 10 servings
Calories 10 kcal

Ingredients
  

  • 1 pint cherry tomatoes
  • cup fresh basil
  • 4 cloves garlic, minced (4 tsp)
  • 1 tbsp balsamic reduction
  • ½ tsp salt
  • ½ tsp black pepper

Instructions
 

  • Cut the cherry tomatoes into bite-sized pieces (halves or quarters depending on size). Chop the basil.
  • Combine tomatoes, basil, garlic, balsamic reduction, salt and pepper in a bowl.
  • Serve immediately or refrigerate for up to 3 days.
  • Hack: Bruschetta can be frozen for up to 8 months. While the thawed product will differ in texture from the fresh product, it will retain its flavor and is best used in cooked dishes.
Keyword appitizer, bruschetta, buffet, easy, homemade, hors d'oeuvres, Italian cuisine, Italian food, picnic food, vegan, vegetarian

If you have leftover tomatoes that are becoming over-ripe, simply puree them in the blender and freeze the fresh puree in sealed freezer bags or containers to use in recipes at a later date.  No need to core, peel or seed ‘em…just toss ‘em right in.  Run the puree through a mesh colander if you want to remove the seeds.

For more ways to deal with an overabundance of fresh tomatoes during the growing season, click here for advice for saving them for later use!

Suggestion: Although bruschetta is known as an appetizer served on toasted bread, it’s also tasty when tossed with pasta (including this Bruschetta Chicken Pasta), over mashed or baked potatoes, with rice or served with eggs!

Dry Italian Salad Dressing Mix

This dry Italian salad dressing mix is more economical than buying it ready-made. It comes together quickly with spices you probably already have in your kitchen!!

Dry Italian Salad Dressing Mix

Dry Italian Salad Dressing Mix

Course Salad Dressing
Servings 2 tbs prepared
Calories 130 kcal

Ingredients
  

  • 1 tbsp garlic powder
  • 1 tbsp onion powder
  • 1 tbsp sugar
  • 2 tbsp oregano
  • 1 tsp black pepper
  • ¼ tsp thyme
  • 1 tbsp parsley
  • 1 tsp basil
  • ¼ tsp celery salt
  • 2 tbsp salt

Instructions
 

  • Mix together all ingredients and store in a tightly sealed container at room temperature.
  • For the salad dressing: Combine 2 tbsp mix with ¼ apple cider vinegar, ⅔ cup olive oil and 2 tbsp water. Shake or whisk to combine.
  • Hack: Use this dry Italian salad dressing mix as a dry rub for chicken or other meats!
  • Hack: Add this mix to soups or other "one pot" meals!
Keyword condiments, dry, easy, homemade, Italian salad dressing, mix, powder, quick prep, salad dressing, spices

Did you know?  Italian salad was not invented in Italy.  Check out the story here!

Suggestion:  Use this mix to make fresh pasta salad with peas!

Authentic Fresh Maine Lobster Roll

Summer’s here so it’s time to treat ourselves to a delicious fresh Maine lobster roll! Cook a few extra while preparing your lobster dinner to make these!

Fresh Maine Lobster Roll

Fresh Maine Lobster Roll

Course lunch, Main Course, Sandwiches
Servings 1
Calories 375 kcal

Ingredients
  

  • lb live soft shell Maine lobster (½ cup cooked lobster meat) 
  • 2 tbsp mayonnaise
  • ½ tsp lemon juice
  • ½ tsp dried chives
  • Salt and pepper to taste
  • ¼ cup shredded lettuce
  • 1 ciabatta roll

Instructions
 

  • Bring 3 quarts of water to a full boil on the stovetop.
  • Add lobster headfirst into pot and boil, uncovered, for 10 minutes.  Carefully remove the lobster from the pot and allow it to cool.
  • Remove lobster meat from the shell
  • Chop meat into small pieces and place in a bowl.
  • In a separate bowl, mix together mayonnaise, lemon juice, chives, salt and pepper.  Add to lobster meat and stir to combine.
  • Slice the ciabatta roll and add lettuce.  Top lettuce with lobster meat and serve immediately.
  • Hack:  Lobster can be cooked in advance and refrigerated in its shell for up to 2 days or tightly wrapped and frozen for 3 months.
  • Hack:  Shelled lobster meat can be refrigerated for up to 4 days (remember to subtract any days it was refrigerated in its shell!) or tightly wrapped and frozen for up to 3 months.
Keyword fresh lobster, lobster, lobster roll, lunch, Maine lobster, sandwich

Need help shelling your lobster?  Click here.  I only remove meat from the claws and tail, stopping at step 8.

Suggestion:  Serve your lobster roll with this colorful and creamy broccoli coleslaw!

Crispy Oven Roasted French Fries

Who loves french fries? These healthier, oven roasted French Fries will hit the spot! I love to eat them with ketchup. What about you?

Oven Roasted French Fries

Oven Roasted French Fries

(Courtesy: Jenn Warren)
Course Side Dish, Snack
Servings 2
Calories 250 kcal

Ingredients
  

  • 1 large russet potato
  • 2 tbs butter
  • ¼ tsp salt
  • ¼ tsp onion powder
  • ¼ tsp garlic powder

Instructions
 

  • Preheat the oven to 425℉.
  • Wash potato and peel (if desired). Cut into ½” strips. Set aside.
  • Place butter in a microwave-safe bowl big enough to accommodate potato strips. Melt butter in the microwave. Mix in onion powder, garlic powder and salt.
  • Line a baking sheet with parchment paper. Place potato strips in a bowl and toss with butter. Lay in a single layer on the baking sheet.
  • Bake in the oven to desired crispness, 20-30 minutes, turning once.
  • Serve immediately.
  • Hack:  To cook in an air fryer, preheat to 380℉.  Spread fries out in a single layer and air fry for 12-15 minutes or until brown, flipping once.
  • If your air fryer is equipped with a rotisserie basket, cook at 325℉ for 10 minutes.  Turn temp up to 400℉ and rotate the basket for 18-20 minutes or until browned.
  • Hack:  For a unique change of pace, serve your fries with easy cheesy buffalo chicken dip!
  • Hack:  These fries pair perfectly with pan-fried chicken tenders!
  • Hack: Reheat leftover fried in the oven just until warm.
Keyword baked, easy, easy prep, french fries, healthy, oven roasted, potatoes, snack


Potaoes are considered “empty calories” by many but nothing could be further from the truth!

Have you ever wondered if an air fryer is worth the investment?  Click here to dicover why I LOVE my Pamered Chef Deluxe Air Fryer!!

Oven Baked Rice Pilaf with Pine Nuts

This oven baked rice pilaf is a versatile side dish, easy to put together and can go right in the oven with a roast, meatloaf or other main entree.

Oven Baked Rice Pilaf

Oven Baked Rice Pilaf

Course Side Dish
Servings 4
Calories 234 kcal

Ingredients
  

  • 1 tbs sesame oil
  • 1 tbs butter
  • ½ cup onion, minced
  • ½ cup carrot, grated
  • 1 cup rice
  • ½ cup pine nuts (optional)
  • 2 cloves garlic, minced (2 tsp)
  • ¼ tsp cumin
  • ¼ tsp coriander
  • ½ tsp paprika
  • ¼ tsp cayenne pepper
  • ¼ tsp black pepper
  • ¼ tsp parsley
  • ¼ tsp thyme
  • ½ tsp salt
  • 1 bay leaf
  • cups chicken stock

Instructions
 

  • Preheat the oven to 350℉.
  • Heat butter and sesame oil in a pan. Add onion and carrot and saute for 3 minutes. Add rice and pine nuts. Continue to saute for 3-5 minutes until onions and carrots are softened.
  • Add garlic, cumin, coriander, paprika, cayenne pepper, black pepper, parsley, thyme and salt. Saute for one minute.
  • Place rice mixture, chicken broth and bay leaf in a 2-quart casserole. Cover and bake for 18 minutes or until no liquid remains in the bottom of the dish.
  • Allow to stand, covered, for 10 minutes. Remove bay leaf and fluff rice before serving.
  • Hack: Frozen or dehydrated onions and carrots can be used in this recipe/
  • Hack: Place serving-size portioned leftovers into freezer bags. Roll to squeeze the air out of the freezer bag, and freeze for up to 3 months. Thaw overnight in the refrigerator and microwave or heat on the stove.
  • Hack:  Pine nuts can be stored in an airtight container in the refrigerator for 2 months or in the freezer for 6 months.
Keyword baked, buffet, easy, holiday side dish, pilaf, rice, rice side, side dish

Did you know?  There are more than 40,000 varieties of rice!  Check out some more fun facts here!

Suggestion: Use the leftover pine nuts in Roasted Asparagus with Pine Nutsfresh green onion pesto, or this Healthy Vegetable Lasagna with Butternut Bechamel!

Simple Roasted Garlic Spread

The versatility of this simple roasted garlic spread cannot be overstated – simply use it anywhere you desire a creamy, bracing kick of garlic flavor.

Roasted Garlic Spread

Roasted Garlic Spread

Course Condiment
Servings 2 tbsp
Calories 105 kcal

Ingredients
  

  • 1 head garlic
  • 2 tsp olive oil
  • 1 cup cream cheese, softened (1 block or 8 oz.)
  • ¼ tsp black pepper
  • ½ tsp dried chives
  • ½ tsp dried basil
  • ½ tsp dried parsley 
  • ½ tsp fried oregano
  • pinch of salt (to taste)

Instructions
 

  • Preheat the oven to 350℉.
  • Remove the outer skins of the garlic, leaving only the skin that covers the cloves.
  • Cut ¼“ off the top of the garlic bulb so that all the cloves are exposed. Set upright on aluminum foil. Drizzle oil over the bulb, making sure that the tops of all the cloves have been covered. Seal aluminum foil over the bulb.
  • Bake for 40-60 minutes, until the bulb is soft. Remove from the oven and allow to cool.
  • Remove the bulb from the foil, turn it upside down and gently squeeze garlic from the skins into a small bowl.
  • Mix in cream cheese, salt, pepper and spices.
  • Allow to rest for at least one hour while flavors blend. Store leftovers in the refrigerator for up to 5 days.
Keyword appetizer, buffet, condiments, cream cheese, easy, football snacks, garlic spread, hors d'oeuvres, party food, roasted garlic, spread, vegetarian

Did you know?  Garlic has many health benefits!  Check out the facts here!

Suggestion: Try this tasty spread on a freshly made gourmet veggie bagel!

Be Not Afraid: Cast Iron Skillet Cooking

Does the thought of cast iron skillet cooking leave your stomach in knots? Be not afraid: It’s easier than you think! I go over the care and use of your pans here.

Cast Iron Skillet Cooking
This post contains affiliate links that, at no additional cost to you, I may earn a small commission. Read the full policy here.

I’ll admit it. For years I was afraid of cast iron skillet cooking. It just seemed sooo complicated and I just didn’t think I could do it. Nor did I really want to try.

One day, my mother gave me an 8” cast iron skillet that had belonged to her mother and my life was changed. Well, my cooking anyway. Although I don’t know exactly how old it is, I’m going to guess it’s 60 years old if it’s a day. It looks as good as the day it was born and the seasoned surface was as smooth as glass. The first time I used it, I was hooked for life.

Why Choose Cast Iron?

Why Choose Cast Iron?

How many sets of pans have you bought in your life? Most of the “economy-priced” pans sold in department stores are made of aluminum. They’re available in different styles, sizes and colors, all the better to match your kitchen, your dishes or whatever outfit you’re wearing today.

But then what happens next? Aluminum is a soft metal so your pans begin to warp. They get dented and the color begins to wear off the outside. Someone uses a metal fork and scratches the nonstick coating (which – FYI – is then in their food). It’s time to replace them but you don’t mind. Maybe you can match the next set with the tablecloth.

Let’s say you decide to shell out a little more cash for some high-quality stainless steel pans. Sure, you’re gonna pay a few hundred dollars but it’s going to last a lifetime, right? Except…that I find that they’re more trouble than they’re worth. I actually have 2 stainless steel skillets that I never use.

In order to avoid having your food stick to these pans, you must cook over higher temperatures. The pan needs to be preheated to just the right temperature, then you need to add just the right amount of oil and heat that to just the right temperature. Only then are you ready to cook your eggs.

The problem here is that I’ve never been able to make it work. Every time I attempt it, I spend the rest of the day scrubbing because there is one thing stainless steel pans are really good at: hanging onto stuck food.

Cast iron pans, on the other hand, are a dream. For the cost of just one set of those “economy” pan sets, you’ll have a pan that’s indestructible and, when properly seasoned, naturally nonstick. A cast-iron pan will, literally, be the last pan you’ll ever have to buy. They don’t ever wear out, warp, fade, dent or crack. And the more you use them, the more nonstick they will become.

Fat Polymerization

Fat Polymerization
Fat Polymerization

According to Quora, fat polymerization is ”All commonly used fats and particularly those high in polyunsaturated fatty acids tend to form larger molecules (known broadly as polymers) when heated under extreme conditions of temperature and time. Under normal processing and cooking conditions, polymers are formed. When oils or fats are heated in a pan, multiple degradation reactions occur, including autoxidation, thermal oxidation, polymerization, cyclization and fission.”

Wait…what? Trust me, it’s relevant. Most of us call it “seasoning the pan”. This is the first step in cast iron cooking and the most important. Seasoning will give your pan a non-stick surface.

Seasoning is an easy process that should be applied to every new cast iron pan you get, even if it claims to be “pre-seasoned”. It’s a process that also can be used on a pan that hasn’t been properly taken care of in the past or hasn’t been used in a while.

Depending on what you cook in your pan, it may need to be reseasoned from time to time. Cooking acidic foods such as tomatoes or using acidic ingredients such as wine or vinegar can damage the seasoning. Cooking foods that don’t have a lot of oil in them (such as baking pizza or cookies) can also leech some of the seasonings away from the pan. This doesn’t mean that you shouldn’t cook these things in your cast iron…it just means you’ll need to season it again at some point.

Here’s the good news: the more you cook in your cast iron, the more durable the seasoning will become. Every time you use oils (whether it be added oils such as olive or oils naturally found in meats) in your pan, the seasoning improves.

So what is the process? Here it is in 7 easy steps:

  • Preheat the oven to 375℉.
  • Thoroughly wash your pan in hot soapy water. If your pan hasn’t been properly cared for, has food residue/carbon build-up or rust, use steel wool to remove it.
  • Dry thoroughly.
  • Spread a thin layer of oil or shortening over the pan using a paper towel or basting/pastry brush. My personal preference is vegetable shortening as it’s easier (read: less messy) to use than liquid oils but you can use any oil you have on hand. Olive oil, sesame oil, flaxseed oil, butter or bacon grease are not recommended due to their low smoke point.
  • Place your pan upside down on the upper rack of your oven. Place a piece of aluminum foil or silicone baking sheet on the lower rack to catch any drips.
  • Bake for one hour.* Shut off the oven and allow the pan to remain in the oven undisturbed until it’s completely cool.
  • That’s it! Go cook something!

*This will likely create a bit of smoke. If you’re sensitive, be sure to open a window or turn on your kitchen fan.

Continuing Care Of Your Cast Iron Skillet

Continuing Care Of Your Cast Iron Skillet

The logical thing to do next is to ask around for advice on how to manage the continuing care of your cast iron skillet. How do you clean it? How do you store it? What foods can you cook in it? What foods should you avoid? How do you preserve the seasoning?

How many different answers did you get?  I’m guessing all of them. I’m guessing that now you know that you should just wipe out your pan after cooking. Unless you should use rock salt to clean it. Except that a stainless steel scrub is the only way to go. Never, ever, let water touch it.

You should always store your cast iron in a dark cupboard except that it’s better to keep it in the oven. Hanging it from the ceiling is optimal unless it falls on your head. In that case, you should take it down and leave it on your stovetop.

Don’t cook stinky foods like garlic and onions in your pan. Acidic foods such as tomatoes, lemons or wine will end in disaster. Eggs will stick. Fish will dry out. And that family-sized chocolate chip cookie? That’s certain to taste exactly like the ham and red-eye gravy you had for dinner. You could cook a steak as long as it hasn’t been marinated (again with that nasty ACID). It might be best to stick to just cornbread and bacon.

This, ladies and gentlemen, is what gives cast iron a bad name.


Real Life: Cooking With Cast Iron

Cooking With Cast Iron

So, what’s a girl to do? Well, the first thing is to remember that these pans are made from iron and steel. There’s not much you can do to hurt their feelings. The only real thing that will put a damper on your day is if it develops rust but since we know rust can be scrubbed out that’s not a deal-breaker. Just kind of a pain.

Here are my thoughts:

Season your pan. Season it when it’s new (even if it claims to be pre-seasoned) and reseason if you notice that food is sticking to it more than usual.

Clean your pan as soon as possible after cooking. If there are food particles stuck to the bottom of the pan, feel free to put a little water in the bottom after removing the food. You can let it sit until the food is loosened, which I’ve found takes about as long as it takes me to eat.

I like to swish the inside of the pan with some soap and water to remove any cooking flavors, using the scrubby side of the sponge to remove any food particles. After rinsing and towel drying, I use a towel or paper towel to apply a thin layer of vegetable shortening to the inside of the pan. Turn the towel over to the “dry” side and wipe any excess shortening from the pan, leaving as thin a sheen as possible. The whole thing takes less than 5 minutes.

If you prefer to use one of the other cleaning methods discussed above, feel free to do so. This is a judgment-free zone.

Don’t allow your pan to remain wet for any length of time. Don’t put it in the dishwasher. Don’t let it soak in the sink until you “get around” to washing it. If it gets wet (intentionally or not) wipe it dry ASAP. This is simply so you don’t have to spend time removing rust from the surface of your pan.

Don’t store leftovers in the pan. Because…again….rust. No one wants rust in their leftovers.

Store your pan in an area where it won’t get wet. Cupboard, oven, stovetop, above, below, east, west, I don’t care. Just not in a wet area.

Cook whatever you want. If it affects your seasoning, simply coat it with a little shortening or reseason it. Cooking some foods will have a learning curve but you’ll get the hang of it in no time!

Real Life Recap – Cooking With Cast Iron: Season your pan and don’t let it rust. The end.

That’s My Story And I’m (Non)Sticking To It

That’s My Story And I’m (Non)Sticking To It

So there it is and it’s just as simple as it seems. What do you think? Are you ready to take the plunge? I promise you won’t regret it.

Be not afraid.

All my best,

Cynthia
cynthia@cynthiaeats.com

Spicy Baked Red Bean Casserole

Serve this spicy red bean casserole with rice, cornbread or tortillas for a satisfying meal or corn chips as an appetizer!

Red Bean Casserole

Red Bean Casserole

Course Main Course
Servings 4
Calories 285 kcal

Ingredients
  

  • cup dried small red beans
  • 4 cups water, divided
  • 1 red onion
  • 2 cloves garlic
  • 1 jalapeno pepper
  • ½ inch fresh ginger, peeled
  • 2 slices bacon
  • tsp cumin
  • ½ tsp salt
  • 2 large tomatoes (1 pound or 2 cups chopped)
  • ¼ tsp chili powder
  • tsp garam masala
  • ½ cup heavy cream
  • ¼ cup pickled red onions

Instructions
 

  • Cover beans with 2 cups of water and allow to soak for 6 - 12 hours. Drain and rinse.
  • Add 2 cups of water and beans to a saucepan. Turn heat to medium. Cover and simmer for 45-60 minutes or until tender, checking occasionally to ensure there is enough water to keep beans from scorching. Drain excess water, if necessary.
  • (NOTE: The above step can be done ahead. Store beans tightly covered in the refrigerator for up to 3 days.)
  • Preheat the oven to 350℉.
  • Roughly chop onion and place in a blender or food processor with garlic, jalapeno and ginger. Puree until smooth adding a bit of water if necessary.
  • Cook bacon in a saute pan over medium-low heat until it's crispy and has rendered its fat. Add onion mixture, cumin and salt. Cook over medium heat, stirring occasionally until the excess moisture has evaporated and turned a golden brown, 8 - 10 minutes.
  • Puree tomatoes in a blender or food processor. Mix tomatoes, onion mixture, chili powder and garam masala together. Gently stir in beans.
  • Transfer to an oven-safe dish and drizzle cream evenly over the top. Bake until sauce is thickened and the top is brown, 30 - 40 minutes.
  • Sprinkle top with pickled red onions and a small amount of brine.
  • Serve hot with rice or tortillas, if desired.
  • Hack: Freeze leftover portions sealed in serving-sized portions for future use. Allow to thaw completely in the refrigerator before reheating.
  • Hack: One cup of frozen onions can be substituted for fresh onion in this recipe.
  • Hack: One 15 oz. can of red beans, drained and rinsed, can be substituted for the dried beans in this recipe.  Skip the soaking and stovetop cooking in this case.
  • Hack: 2 cups tomato sauce can be substituted for the fresh tomatoes.
Keyword baked beans, bean casserole, bean supper, beans, casserole, dried beans, dried legumes, easy, legumes, red beans


Did you know? Red beans are a member of the legume family.  Legumes come in many options, are inexpensive and they’re packed with nutrition!!

Suggestion: Pair this with some cheddar cheese jalapeno cornbread.

error

Enjoy this blog? Please spread the word :)

Follow by Email
YouTube
YouTube
Pinterest
Pinterest
fb-share-icon
LinkedIn
LinkedIn
Share
Instagram